Dynamic Application Security Testing (DAST) (ULTIMATE)
Introduced in GitLab Ultimate 10.4.
NOTE: 4 of the top 6 attacks were application based. Download our whitepaper, "A Seismic Shift in Application Security" to learn how to protect your organization.
Running static checks on your code is the first step to detect vulnerabilities that can put the security of your code at risk. Yet, once deployed, your application is exposed to a new category of possible attacks, such as cross-site scripting or broken authentication flaws. This is where Dynamic Application Security Testing (DAST) comes into place.
Overview
If you are using GitLab CI/CD, you can analyze your running web application(s) for known vulnerabilities using Dynamic Application Security Testing (DAST).
You can take advantage of DAST by either including the CI job in
your existing .gitlab-ci.yml file or by implicitly using
Auto DAST
that is provided by Auto DevOps.
GitLab checks the DAST report, compares the found vulnerabilities between the source and target branches, and shows the information right on the merge request.
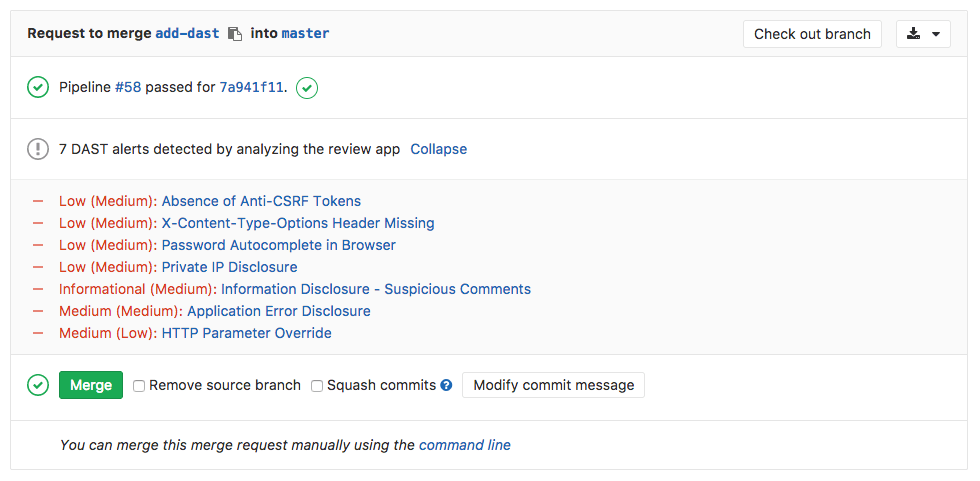
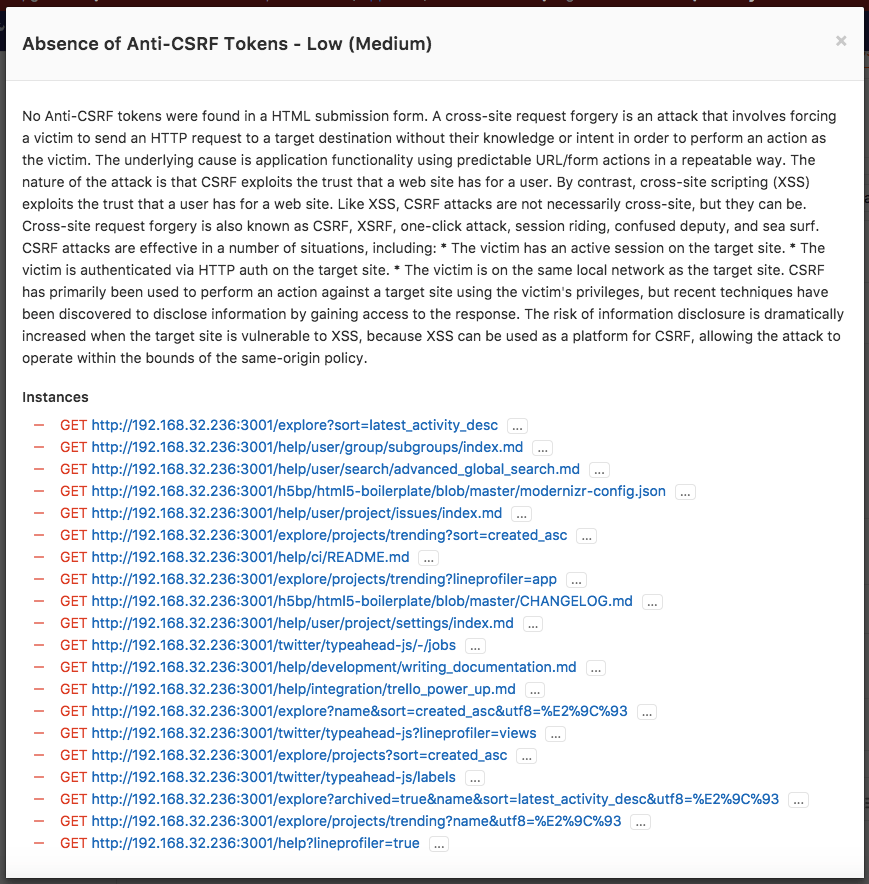
By clicking on one of the detected linked vulnerabilities, you will be able to see the details and the URL(s) affected.
Dynamic Application Security Testing (DAST) is using the popular open source tool OWASP ZAProxy to perform an analysis on your running web application.
By default, DAST executes ZAP Baseline Scan and will perform passive scanning only. It will not actively attack your application.
However, DAST can be configured to also perform a so-called "active scan". That is, attack your application and produce a more extensive security report. It can be very useful combined with Review Apps.
The dast Docker image in GitLab container registry is updated on a weekly basis to have all owasp2docker-weekly updates in it.
Use cases
It helps you automatically find security vulnerabilities in your running web applications while you are developing and testing your applications.
Requirements
To run a DAST job, you need GitLab Runner with the
docker executor.
Configuration
For GitLab 11.9 and later, to enable DAST, you must
include the
DAST.gitlab-ci.yml template
that's provided as a part of your GitLab installation.
For GitLab versions earlier than 11.9, you can copy and use the job as defined
in that template.
Add the following to your .gitlab-ci.yml file:
include:
  template: DAST.gitlab-ci.yml

variables:
  DAST_WEBSITE: https://example.com
There are two ways to define the URL to be scanned by DAST:
-
Set the
DAST_WEBSITEvariable. -
Add it in an
environment_url.txtfile at the root of your project. This is great for testing in dynamic environments. In order to run DAST against an app that is dynamically created during a GitLab CI pipeline, have the app persist its domain in anenvironment_url.txtfile, and DAST will automatically parse that file to find its scan target. You can see an example of this in our Auto DevOps CI YML.
If both values are set, the DAST_WEBSITE value will take precedence.
The included template will create a dast job in your CI/CD pipeline and scan
your project's source code for possible vulnerabilities.
The results will be saved as a DAST report artifact that you can later download and analyze. Due to implementation limitations we always take the latest DAST artifact available. Behind the scenes, the GitLab DAST Docker image is used to run the tests on the specified URL and scan it for possible vulnerabilities.
By default, the DAST template will use the latest major version of the DAST Docker image. Using the DAST_VERSION variable,
you can choose to automatically update DAST with new features and fixes by pinning to a major version (e.g. 1), only update fixes by pinning to a minor version (e.g. 1.6) or prevent all updates by pinning to a specific version (e.g. 1.6.4).
Find the latest DAST versions on the Releases page.
Authenticated scan
It's also possible to authenticate the user before performing the DAST checks:
include:
  template: DAST.gitlab-ci.yml

variables:
  DAST_WEBSITE: https://example.com
  DAST_AUTH_URL: https://example.com/sign-in
  DAST_USERNAME: john.doe@example.com
  DAST_PASSWORD: john-doe-password
  DAST_USERNAME_FIELD: session[user] # the name of username field at the sign-in HTML form
  DAST_PASSWORD_FIELD: session[password] # the name of password field at the sign-in HTML form
  DAST_AUTH_EXCLUDE_URLS: http://example.com/sign-out,http://example.com/sign-out-2 # optional, URLs to skip during the authenticated scan; comma-separated, no spaces in between
The results will be saved as a DAST report artifact that you can later download and analyze. Due to implementation limitations, we always take the latest DAST artifact available.
Full scan
DAST can be configured to perform ZAP Full Scan, which includes both passive and active scanning against the same target website:
include:
  template: DAST.gitlab-ci.yml

variables:
  DAST_FULL_SCAN_ENABLED: "true"
Domain validation
The DAST job can be run anywhere, which means you can accidentally hit live web servers and potentially damage them. You could even take down your production environment. For that reason, you should use domain validation.
Domain validation is not required by default. It can be required by setting the environment variable DAST_FULL_SCAN_DOMAIN_VALIDATION_REQUIRED to true.
include:
  template: DAST.gitlab-ci.yml

variables:
  DAST_FULL_SCAN_ENABLED: "true"
  DAST_FULL_SCAN_DOMAIN_VALIDATION_REQUIRED: "true"
Since ZAP full scan actively attacks the target application, DAST sends a ping to the target (normally defined in DAST_WEBSITE or environment_url.txt) beforehand.
If DAST_FULL_SCAN_DOMAIN_VALIDATION_REQUIRED is false or unset, the scan will proceed unless the response to the ping
includes a Gitlab-DAST-Permission header with a value of deny.
If DAST_FULL_SCAN_DOMAIN_VALIDATION_REQUIRED is true, the scan will exit unless the response to the ping
includes a Gitlab-DAST-Permission header with a value of allow.
Here are some examples of adding the Gitlab-DAST-Permission header to a response in Rails, Django, and Node (with Express).
Ruby on Rails
Here's how you would add a custom header in Ruby on Rails:
class DastWebsiteTargetController < ActionController::Base
  def dast_website_target
    response.headers['Gitlab-DAST-Permission'] = 'allow'

    head :ok
  end
end
Django
Here's how you would add a custom header in Django:
class DastWebsiteTargetView(View):
    def head(self, *args, **kwargs):
      response = HttpResponse()
      response['Gitlab-Dast-Permission'] = 'allow'

      return response
Node (with Express)
Here's how you would add a custom header in Node (with Express):
app.get('/dast-website-target', function(req, res) {
  res.append('Gitlab-DAST-Permission', 'allow')
  res.send('Respond to DAST ping')
})
Domain validation header via a proxy
It's also possible to add the Gitlab-DAST-Permission header via a proxy.
NGINX
The following config allows NGINX to act as a reverse proxy and add the Gitlab-DAST-Permission header:
# default.conf
server {
    listen 80;
    server_name localhost;

    location / {
        proxy_pass http://test-application;
        add_header Gitlab-DAST-Permission allow;
    }
}
Apache
Apache can also be used as a reverse proxy
to add the Gitlab-DAST-Permission header.
To do so, add the following lines to httpd.conf:
# httpd.conf
LoadModule proxy_module modules/mod_proxy.so
LoadModule proxy_connect_module modules/mod_proxy_connect.so
LoadModule proxy_http_module modules/mod_proxy_http.so

<VirtualHost *:80>
  ProxyPass "/" "http://test-application.com/"
  ProxyPassReverse "/" "http://test-application.com/"
  Header set Gitlab-DAST-Permission "allow"
</VirtualHost>
This snippet contains a complete httpd.conf file
configured to act as a remote proxy and add the Gitlab-DAST-Permission header.
Customizing the DAST settings
The DAST settings can be changed through environment variables by using the
variables parameter in .gitlab-ci.yml.
These variables are documented in available variables.
For example:
include:
  template: DAST.gitlab-ci.yml

variables:
  DAST_WEBSITE: https://example.com
  DAST_TARGET_AVAILABILITY_TIMEOUT: 120
Because the template is evaluated before the pipeline configuration, the last mention of the variable will take precedence.
Overriding the DAST template
If you want to override the job definition (for example, change properties like
variables or dependencies), you need to declare a dast job after the
template inclusion and specify any additional keys under it. For example:
include:
  template: DAST.gitlab-ci.yml

dast:
  stage: dast # IMPORTANT: don't forget to add this
  variables:
    DAST_WEBSITE: https://example.com
    CI_DEBUG_TRACE: "true"
As the DAST job belongs to a separate dast stage that runs after all
default stages,
don't forget to add stage: dast when you override the template job definition.
Available variables
DAST can be configured using environment variables.
Since it's a wrapper around the ZAP scanning scripts
(baseline
or full scan), it
accepts all arguments those scripts recognize (the arguments are the same).
The choice of the scan type depends on the DAST_FULL_SCAN_ENABLED environment
variable value.
| Environment variable | Required | Description |
|---|---|---|
DAST_WEBSITE |
yes | The URL of the website to scan. |
DAST_AUTH_URL |
no | The authentication URL of the website to scan. |
DAST_USERNAME |
no | The username to authenticate to in the website. |
DAST_PASSWORD |
no | The password to authenticate to in the website. |
DAST_USERNAME_FIELD |
no | The name of username field at the sign-in HTML form. |
DAST_PASSWORD_FIELD |
no | The name of password field at the sign-in HTML form. |
DAST_AUTH_EXCLUDE_URLS |
no | The URLs to skip during the authenticated scan; comma-separated, no spaces in between. |
DAST_TARGET_AVAILABILITY_TIMEOUT |
no | Time limit in seconds to wait for target availability. Scan is attempted nevertheless if it runs out. Integer. Defaults to 60. |
DAST_FULL_SCAN_ENABLED |
no | Switches the tool to execute ZAP Full Scan instead of ZAP Baseline Scan. Boolean. true, True, or 1 are considered as true value, otherwise false. Defaults to false. |
DAST_FULL_SCAN_DOMAIN_VALIDATION_REQUIRED |
no | Requires domain validation when running DAST full scans. Boolean. true, True, or 1 are considered as true value, otherwise false. Defaults to false. |
Reports JSON format
CAUTION: Caution: The JSON report artifacts are not a public API of DAST and their format may change in the future.
The DAST tool emits a JSON report report file. Sample report files can be found in the DAST repository.
There are two formats of data in the JSON document that are used side by side: the proprietary ZAP format which will be eventually deprecated, and a "common" format which will be the default in the future.
Security Dashboard
The Security Dashboard is a good place to get an overview of all the security vulnerabilities in your groups, projects and pipelines. Read more about the Security Dashboard.
Interacting with the vulnerabilities
Once a vulnerability is found, you can interact with it. Read more on how to interact with the vulnerabilities.
Vulnerabilities database update
For more information about the vulnerabilities database update, check the maintenance table.
Troubleshooting
Running out of memory
By default, ZAProxy, which DAST relies on, is allocated memory that sums to 25% of the total memory on the host. Since it keeps most of its information in memory during a scan, it is possible for DAST to run out of memory while scanning large applications. This results in the following error:
[zap.out] java.lang.OutOfMemoryError: Java heap spaceFortunately, it is straightforward to increase the amount of memory available
for DAST by overwriting the script key in the DAST template:
include:
  template: DAST.gitlab-ci.yml

dast:
  script:
    - export DAST_WEBSITE=${DAST_WEBSITE:-$(cat environment_url.txt)}
    - /analyze -t $DAST_WEBSITE -z"-Xmx3072m"
Here, DAST is being allocated 3072 MB.
Change the number after -Xmx to the required memory amount.