Customer Docs
This section contains information for:
- New customers about choosing which GitLab is right for you.
- Existing customers about managing subscriptions.
Also see our subscription FAQ.
Which GitLab?
There are two ways to use GitLab:
- GitLab.com: GitLab's SaaS offering. You don't need to install anything to use GitLab.com, you only need to sign up and start using GitLab straight away.
- GitLab self-managed: Install, administer, and maintain your own GitLab instance.
The following sections outline tiers and features within GitLab.com and GitLab self-managed.
GitLab.com
GitLab.com is hosted, managed, and administered by GitLab, Inc., with free and paid subscriptions for individuals and teams in the following tiers:
| Tier | Includes same features available in |
|---|---|
| Free | Core self-managed tier. |
| Bronze | Starter self-managed tier. |
| Silver | Premium self-managed tier. |
| Gold | Ultimate self-managed tier. |
GitLab.com subscriptions grant access to the same features available in GitLab self-managed, except administration tools and settings.
GitLab.com allows you to apply your subscription to a group or your personal user.
When applied to:
- A group, the group, all subgroups, and all projects under the selected group on GitLab.com will have the features of the associated plan. It is recommended to go with a group plan when managing projects and users of an organization.
- A personal userspace instead, all projects will have features with the subscription applied, but as it is not a group, group features will not be available.
TIP: Tip: To support the open source community and encourage the development of open source projects, GitLab grants access to Gold features for all GitLab.com public projects, regardless of the subscription.
The following resources are available for more information on GitLab.com:
- Feature comparison, for information on what features are available at each tier.
- GitLab pricing page, for subscription information and a free trial.
- Our product marketing page, for additional information including:
- How different tiers are licensed.
- The different GitLab distributions.
Subscribing to GitLab.com
To subscribe to GitLab.com:
- Create a user account for yourself using our sign up page.
- Create a group. GitLab groups help assemble related projects together allowing you to grant members access to several projects at once. A group is not required if you plan on having projects inside a personal namespace.
- Create additional users and add them to the group.
- Select the Bronze, Silver, or Gold GitLab.com plan through the GitLab Subscription Manager.
- Link your GitLab.com account with your GitLab Subscription Manager account. Once signed into the GitLab Subscription Manager, if your account is not already linked, you will prompted to link your account with a Link my GitLab Account button.
- Associate the group with the subscription.
TIP: Tip: You can also go to the My Account page to add or change the GitLab.com account link.
GitLab self-managed
With GitLab self-managed, you deploy your own GitLab instance on-premises or on a cloud of your choice. GitLab self-managed is available for free and with paid subscriptions in the following tiers:
| Tier | Includes |
|---|---|
| Core | Core features. |
| Starter | Core and Starter features. |
| Premium | Core, Starter, and Premium features. |
| Ultimate | Core, Starter, Premium, and Ultimate features. |
The following resources are available for more information on GitLab self-managed:
- Feature comparison, for information on what features are available at each tier.
- GitLab pricing page, for subscription information and a free trial.
- Our product marketing page, for additional information including:
- How different tiers are licensed.
- The different GitLab distributions.
Subscribing through GitLab self-managed
To subscribe to GitLab through a self-managed installation:
- Install GitLab.
- Complete the installation with administration tasks.
- Select the Starter, Premium, or Ultimate self-managed plan through the GitLab Subscription Manager.
- Apply your license file. After purchase, a license file is sent to the email address associated to the GitLab Subscription Manager account, which needs to be uploaded to your GitLab instance.
TIP: Tip: If you are purchasing a subscription for an existing Core self-managed instance, ensure you are purchasing enough seats to cover your users.
Managing subscriptions
You can view and manage subscriptions through our GitLab Subscription Manager.
View subscription and seats
Visit the GitLab Subscription Manager to view and manage:
- The subscriptions you have purchased.
- The number of seats associated with the subscription.
- Retrieve copies of invoices.
- Change the credit card on file.
For more information, please see our:
- Subscription FAQ.
- Pricing page, which includes information on our true-up pricing policy when adding more users other than at the time of purchase.
NOTE: Note: The GitLab Subscription Manager account can have the same email address as your GitLab.com account, but is a separate login. If the two accounts are linked together, you can use the Or sign in with GitLab.com link underneath the Sign In button.
Change billing information
To change billing information:
- Log in to GitLab Subscription Manager.
- Go to the My Account page.
- Make the required changes to the Account Details information.
- Click Update Account.
NOTE: Note: Future purchases will use the information in this section. The email listed in this section is used for the GitLab Subscription Manager login and for license-related email communication.
Manage GitLab.com account
This section provided information specific to managing subscriptions with a GitLab.com account.
Change linked account
To change the GitLab.com account associated with a GitLab Subscription Manager account:
- Log in to the GitLab Subscription Manager.
- Go to GitLab.com in a separate browser tab. Ensure you are not logged in.
- On the GitLab Subscription Manager page, click My Account in the top menu.
- Under Your GitLab.com account, click Change linked account button.
- Log in to GitLab.com account to link to.
Change associated namespace
With a linked GitLab.com account:
- Log in to the GitLab Subscription Manager.
- Navigate to the Manage Purchases page.
- Click Change linked group.
- Select the desired group from the This subscription is for dropdown.
- Click Proceed to checkout.
Subscription charges are calculated based on the total number of users in a group, including its subgroups and nested projects. If the total number of users exceeds the number of seats in your subscription, you will be charged for the additional users.
Confirm or upgrade your subscription
To see the status of your GitLab.com subscription, you can click on the Billings section of the relevant namespace:
- For individuals:
- Go to User Avatar > Settings.
- Click Billing.
- For groups, go to the group's Settings dropdown, under Billing.
The following table describes details of your subscription for groups:
| Field | Description |
|---|---|
| Seats in subscription | If this is a paid plan, represents the number of seats you've paid to support in your group. |
| Seats currently in use | Number of active seats currently in use. |
| Max seats used | Highest number of seats you've used. If this exceeds the seats in subscription, you may owe an additional fee for the additional users. |
| Seats owed | If your max seats used exceeds the seats in your subscription, you'll owe an additional fee for the users you've added. |
| Subscription start date | Date your subscription started. If this is for a Free plan, is the date you transitioned off your group's paid plan. |
| Subscription end date | Date your current subscription will end. Does not apply to Free plans. |
CI pipeline minutes
CI pipeline minutes are the execution time for your pipelines on our shared runners. Each GitLab.com tier includes a monthly quota of CI pipeline minutes. The quota is applied per group, shared across all members of that group, its subgroups and nested projects. To view the usage, navigate to the group's page, then Settings > Usage Quotas.
Only pipeline minutes for our shared runners are restricted. If you have a specific runner setup for your projects, there is no limit to your build time on GitLab.com.
The minutes limit only applies to private projects. The available quota is reset on the first of each calendar month at midnight UTC.
If you reach your limit, you can purchase additional CI minutes, or upgrade your account to Silver or Gold. Note, your own runners can still be used even if you reach your limits.
How pipeline quota usage is calculated
Pipeline quota usage is calculated as the sum of the duration of each individual job. This is slightly different to how pipeline duration is calculated. Pipeline quota usage doesn't consider the intersection of jobs.
A simple example is:
A (1, 3) B (2, 4) C (6, 7)
In the example:
A begins at 1 and ends at 3. B begins at 2 and ends at 4. C begins at 6 and ends at 7. Visually, it can be viewed as:
0  1  2  3  4  5  6  7
   AAAAAAA
      BBBBBBB
                  CCCC
The sum of each individual job is being calculated therefore in this example, 8 runner minutes would be used for this pipeline:
A + B + C = 3 + 3 + 2 => 8Extra Shared Runners pipeline minutes
If you're using GitLab.com, you can purchase additional CI minutes so your pipelines will not be blocked after you have used all your CI minutes from your main quota. Additional minutes:
- Are only used once the shared quota included in your subscription runs out.
- Roll over month to month.
In order to purchase additional minutes, you should follow these steps:
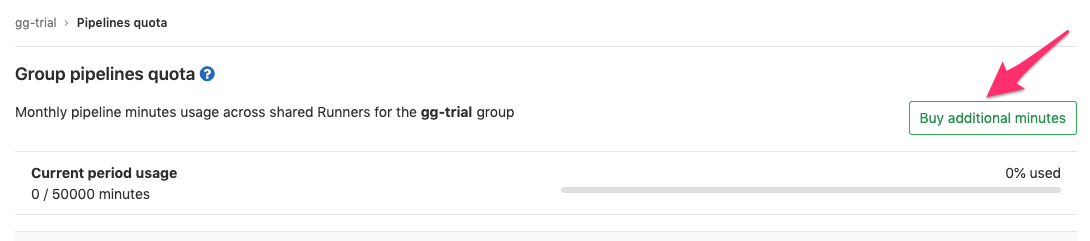
-
Go to Group > Settings > Pipelines quota. Once you are on that page, click on Buy additional minutes.

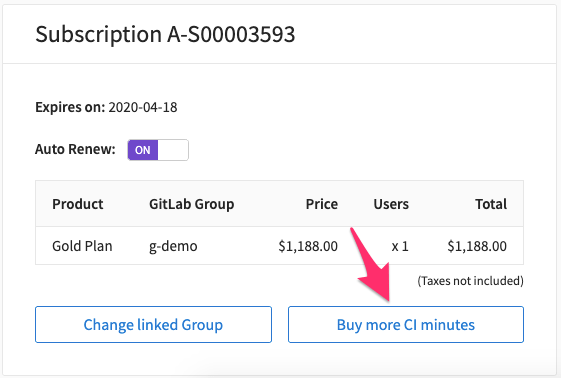
-
Locate the subscription card that is linked to your group on GitLab.com, click on Buy more CI minutes, and complete the details about the transaction.
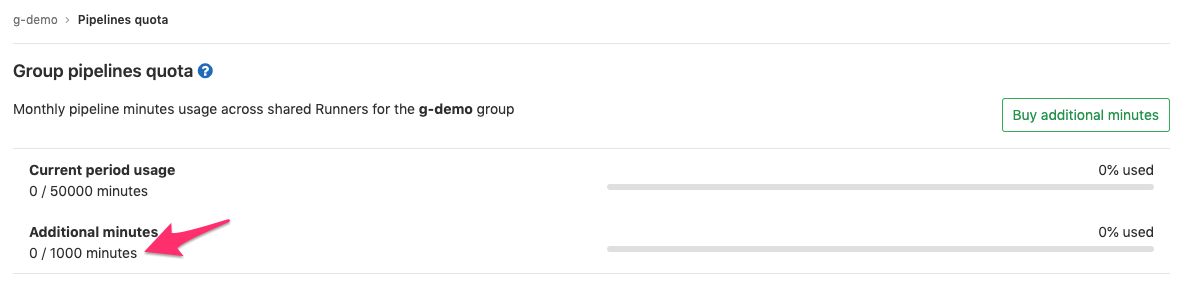
-
Once we have processed your payment, the extra CI minutes will be synced to your Group and you can visualize it from the Group > Settings > Pipelines quota page:
The Additional minutes displayed now includes the purchased additional CI minutes, plus any minutes rolled over from last month.
Be aware that:
- If you have purchased extra CI minutes before the purchase of a paid plan, we will calculate a pro-rated charge for your paid plan. That means you may be charged for less than one year since your subscription was previously created with the extra CI minutes.
- Once the extra CI minutes has been assigned to a Group they cannot be transferred to a different Group.
- If you have some minutes used over your default quota, these minutes will be deducted from your Additional Minutes quota immediately after your purchase of additional minutes.
What happens when my CI minutes run out
When the CI minutes run out, an email is sent automatically to notify the owner(s) of the group/namespace, including a link to purchase more minutes.
If you are not the owner of the group, you will need to contact them to let them know they need to purchase more minutes.
Subscription changes and your data
When your subscription or trial expires, GitLab does not delete your data.
However, depending on the tier and feature, your data may become inaccessible.
Please note that some features may not behave as expected if a graceful fallback is not currently implemented. For example, environment specific variables not being passed.
If you renew or upgrade, your data will again be accessible.
Self-managed data
For self-managed customers, there is a two-week grace period when your features will continue to work as-is, after which the entire instance will become read only.
However, if you remove the license, you will immediately revert to Core features.
Need help?
GitLab's Documentation offers a wide range of topics covering the use and administration of GitLab.
We also encourage all users to search our project trackers for known issues and existing feature requests in:
These issues are the best avenue for getting updates on specific product plans and for communicating directly with the relevant GitLab team members.
Contacting Support
Learn more about:
- The tiers of GitLab Support.
- Submit a request via the Support Portal.