GitLab Managed Apps
GitLab provides GitLab Managed Apps, a one-click install for various applications which can be added directly to your configured cluster.
These applications are needed for Review Apps and deployments when using Auto DevOps.
You can install them after you create a cluster.
Installing applications
Applications managed by GitLab will be installed onto the gitlab-managed-apps namespace.
This namespace:
- Is different from the namespace used for project deployments.
- Is created once.
- Has a non-configurable name.
To see a list of available applications to install. For a:
- Project-level cluster, navigate to your project's Operations > Kubernetes.
- Group-level cluster, navigate to your group's Kubernetes page.
Install Helm first as it's used to install other applications.
NOTE: Note: As of GitLab 11.6, Helm will be upgraded to the latest version supported by GitLab before installing any of the applications.
The following applications can be installed:
With the exception of Knative, the applications will be installed in a dedicated
namespace called gitlab-managed-apps.
NOTE: Note: Some applications are installable only for a project-level cluster. Support for installing these applications in a group-level cluster is planned for future releases. For updates, see the issue tracking progress.
CAUTION: Caution: If you have an existing Kubernetes cluster with Helm already installed, you should be careful as GitLab cannot detect it. In this case, installing Helm via the applications will result in the cluster having it twice, which can lead to confusion during deployments.
Helm
- Introduced in GitLab 10.2 for project-level clusters.
- Introduced in GitLab 11.6 for group-level clusters.
Helm is a package manager for Kubernetes and is
required to install all the other applications. It is installed in its
own pod inside the cluster which can run the helm CLI in a safe
environment.
NOTE: Note: Installing Helm as a GitLab-managed App behind a proxy is not supported, but a workaround is available.
cert-manager
Introduced in GitLab 11.6 for project- and group-level clusters.
cert-manager is a native Kubernetes certificate management controller that helps with issuing certificates. Installing cert-manager on your cluster will issue a certificate by Let's Encrypt and ensure that certificates are valid and up-to-date.
The chart used to install this application depends on the version of GitLab used. In:
- GitLab 12.3 and newer, the jetstack/cert-manager
chart is used with a
values.yamlfile. - GitLab 12.2 and older, the stable/cert-manager chart was used.
If you have installed cert-manager prior to GitLab 12.3, Let's Encrypt will block requests from older versions of cert-manager.
To resolve this:
- Uninstall cert-manager (consider backing up any additional configuration).
- Install cert-manager again.
GitLab Runner
- Introduced in GitLab 10.6 for project-level clusters.
- Introduced in GitLab 11.10 for group-level clusters.
GitLab Runner is the open source project that is used to run your jobs and send the results back to GitLab. It is used in conjunction with GitLab CI/CD, the open-source continuous integration service included with GitLab that coordinates the jobs.
If the project is on GitLab.com, shared Runners are available (the first 2000 minutes are free, you can buy more later) and you do not have to deploy one if they are enough for your needs. If a project-specific Runner is desired, or there are no shared Runners, it is easy to deploy one.
Note that the deployed Runner will be set as privileged, which means it will essentially have root access to the underlying machine. This is required to build Docker images, so it is the default. Make sure you read the security implications before deploying one.
NOTE: Note:
The runner/gitlab-runner
chart is used to install this application with a
values.yaml
file. Customizing installation by modifying this file is not supported.
Ingress
- Introduced in GitLab 10.2 for project-level clusters.
- Introduced in GitLab 11.6 for group-level clusters.
Ingress can provide load balancing, SSL termination, and name-based virtual hosting. It acts as a web proxy for your applications and is useful if you want to use Auto DevOps or deploy your own web apps.
NOTE: Note: With the following procedure, a load balancer must be installed in your cluster to obtain the endpoint. You can use either Ingress, or Knative's own load balancer (Istio) if using Knative.
In order to publish your web application, you first need to find the endpoint which will be either an IP address or a hostname associated with your load balancer.
To install it, click on the Install button for Ingress. GitLab will attempt to determine the external endpoint and it should be available within a few minutes.
Determining the external endpoint automatically
Introduced in GitLab 10.6.
After you install Ingress, the external endpoint should be available within a few minutes.
TIP: Tip:
This endpoint can be used for the
Auto DevOps base domain
using the KUBE_INGRESS_BASE_DOMAIN environment variable.
If the endpoint doesn't appear and your cluster runs on Google Kubernetes Engine:
- Check your Kubernetes cluster on Google Kubernetes Engine to ensure there are no errors on its nodes.
- Ensure you have enough Quotas on Google Kubernetes Engine. For more information, see Resource Quotas.
- Check Google Cloud's Status to ensure they are not having any disruptions.
Once installed, you may see a ? for "Ingress IP Address" depending on the
cloud provider. For EKS specifically, this is because the ELB is created
with a DNS name, not an IP address. If GitLab is still unable to
determine the endpoint of your Ingress or Knative application, you can
determine it manually.
NOTE: Note:
The stable/nginx-ingress
chart is used to install this application with a
values.yaml
file.
Determining the external endpoint manually
If the cluster is on GKE, click the Google Kubernetes Engine link in the
Advanced settings, or go directly to the
Google Kubernetes Engine dashboard
and select the proper project and cluster. Then click Connect and execute
the gcloud command in a local terminal or using the Cloud Shell.
If the cluster is not on GKE, follow the specific instructions for your
Kubernetes provider to configure kubectl with the right credentials.
The output of the following examples will show the external endpoint of your
cluster. This information can then be used to set up DNS entries and forwarding
rules that allow external access to your deployed applications.
If you installed Ingress via the Applications, run the following command:
kubectl get service --namespace=gitlab-managed-apps ingress-nginx-ingress-controller -o jsonpath='{.status.loadBalancer.ingress[0].ip}'Some Kubernetes clusters return a hostname instead, like Amazon EKS. For these platforms, run:
kubectl get service --namespace=gitlab-managed-apps ingress-nginx-ingress-controller -o jsonpath='{.status.loadBalancer.ingress[0].hostname}'For Istio/Knative, the command will be different:
kubectl get svc --namespace=istio-system knative-ingressgateway -o jsonpath='{.status.loadBalancer.ingress[0].ip} 'Otherwise, you can list the IP addresses of all load balancers:
kubectl get svc --all-namespaces -o jsonpath='{range.items[?(@.status.loadBalancer.ingress)]}{.status.loadBalancer.ingress[*].ip} 'NOTE: Note: If EKS is used, an Elastic Load Balancer will also be created, which will incur additional AWS costs.
NOTE: Note:
You may see a trailing % on some Kubernetes versions, do not include it.
The Ingress is now available at this address and will route incoming requests to
the proper service based on the DNS name in the request. To support this, a
wildcard DNS CNAME record should be created for the desired domain name. For example,
*.myekscluster.com would point to the Ingress hostname obtained earlier.
Using a static IP
By default, an ephemeral external IP address is associated to the cluster's load balancer. If you associate the ephemeral IP with your DNS and the IP changes, your apps will not be able to be reached, and you'd have to change the DNS record again. In order to avoid that, you should change it into a static reserved IP.
Read how to promote an ephemeral external IP address in GKE.
Pointing your DNS at the external endpoint
Once you've set up the external endpoint, you should associate it with a wildcard DNS
record such as *.example.com.
in order to be able to reach your apps. If your external endpoint is an IP address,
use an A record. If your external endpoint is a hostname, use a CNAME record.
Web Application Firewall (ModSecurity)
Introduced in GitLab 12.7.
Out of the box, GitLab provides you real-time security monitoring with ModSecurity.
Modsecurity is a toolkit for real-time web application monitoring, logging, and access control. With GitLab's offering, the OWASP's Core Rule Set, which provides generic attack detection capabilities, is automatically applied.
This feature:
-
Runs in "Detection-only mode" unless configured otherwise.
-
Is viewable by checking your Ingress controller's
modseclog for rule violations. For example:kubectl logs -n gitlab-managed-apps $(kubectl get pod -n gitlab-managed-apps -l app=nginx-ingress,component=controller --no-headers=true -o custom-columns=:metadata.name) modsecurity-log -f
To enable ModSecurity, check the Enable Web Application Firewall checkbox when installing your Ingress application.
There is a small performance overhead by enabling ModSecurity. If this is
considered significant for your application, you can disable ModSecurity's
rule engine for your deployed application by setting
the deployment variable
AUTO_DEVOPS_MODSECURITY_SEC_RULE_ENGINE to Off. This will prevent ModSecurity
from processing any requests for the given application or environment.
To permanently disable it, you must uninstall and reinstall your Ingress application for the changes to take effect.
JupyterHub
- Introduced in GitLab 11.0 for project-level clusters.
- Introduced in GitLab 12.3 for group and instance-level clusters.
JupyterHub is a multi-user service for managing notebooks across a team. Jupyter Notebooks provide a web-based interactive programming environment used for data analysis, visualization, and machine learning.
Authentication will be enabled only for project members for project-level clusters and group members for group-level clusters with Developer or higher access to the associated project or group.
We use a custom Jupyter image that installs additional useful packages on top of the base Jupyter. You will also see ready-to-use DevOps Runbooks built with Nurtch's Rubix library.
More information on creating executable runbooks can be found in our Runbooks documentation. Note that Ingress must be installed and have an IP address assigned before JupyterHub can be installed.
NOTE: Note:
The jupyter/jupyterhub
chart is used to install this application with a
values.yaml
file.
Jupyter Git Integration
Introduced in GitLab 12.0 for project-level clusters. Introduced in GitLab 12.3 for group and instance-level clusters.
When installing JupyterHub onto your Kubernetes cluster, JupyterLab's Git extension is automatically provisioned and configured using the authenticated user's:
- Name.
- Email.
- Newly created access token.
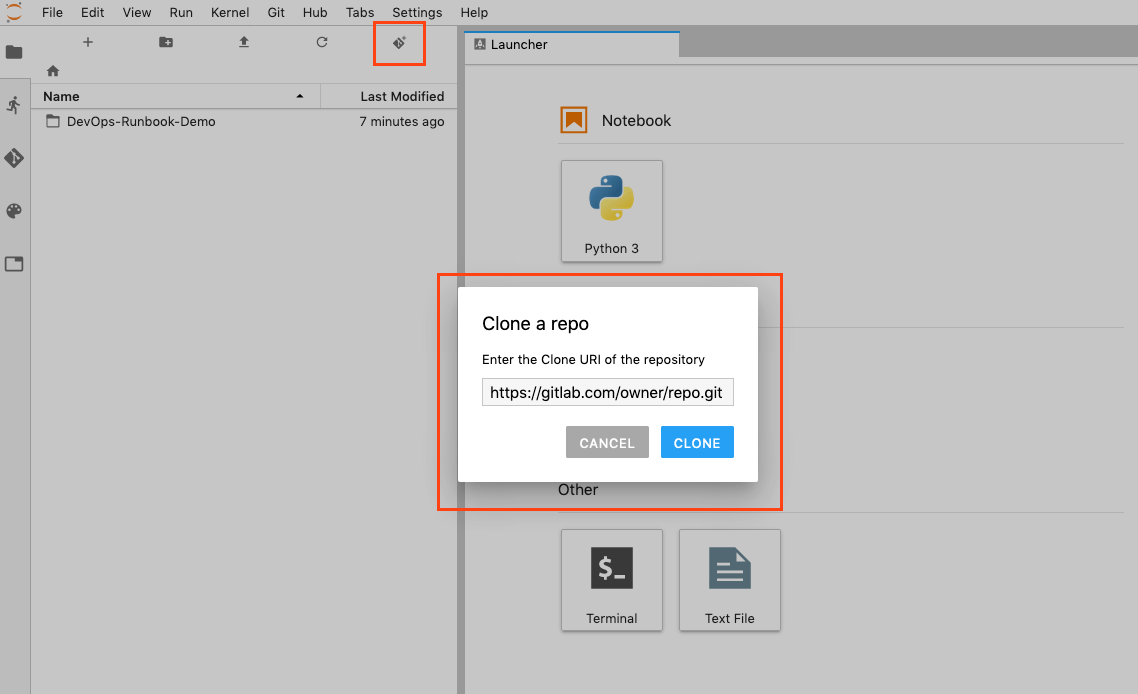
JupyterLab's Git extension enables full version control of your notebooks as well as issuance of Git commands within Jupyter. Git commands can be issued via the Git tab on the left panel or via Jupyter's command line prompt.
NOTE: Note: JupyterLab's Git extension stores the user token in the JupyterHub DB in encrypted format and in the single user Jupyter instance as plain text. This is because Git requires storing credentials as plain text. Potentially, if a nefarious user finds a way to read from the file system in the single user Jupyter instance they could retrieve the token.
You can clone repositories from the files tab in Jupyter:
Knative
- Introduced in GitLab 11.5 for project-level clusters.
- Introduced in GitLab 12.3 for group- and instance-level clusters.
Knative provides a platform to create, deploy, and manage serverless workloads from a Kubernetes cluster. It is used in conjunction with, and includes Istio to provide an external IP address for all programs hosted by Knative.
You will be prompted to enter a wildcard
domain where your applications will be exposed. Configure your DNS
server to use the external IP address for that domain. For any
application created and installed, they will be accessible as
<program_name>.<kubernetes_namespace>.<domain_name>. This will require
your Kubernetes cluster to have RBAC
enabled.
NOTE: Note:
The knative/knative
chart is used to install this application.
Prometheus
- Introduced in GitLab 10.4 for project-level clusters.
- Introduced in GitLab 11.11 for group-level clusters.
Prometheus is an open-source monitoring and alerting system useful to supervise your deployed applications.
GitLab is able to monitor applications automatically, using the Prometheus integration. Kubernetes container CPU and memory metrics are automatically collected, and response metrics are retrieved from NGINX Ingress as well.
To enable monitoring, simply install Prometheus into the cluster with the Install button.
NOTE: Note:
The stable/prometheus
chart is used to install this application with a
values.yaml
file.
Crossplane
- Introduced in GitLab 12.5 for project-level clusters.
Crossplane is a multi-cloud control plane useful for managing applications and infrastructure across multiple clouds. It extends the Kubernetes API using:
- Custom resources.
- Controllers that watch those custom resources.
Crossplane allows provisioning and lifecycle management of infrastructure components across cloud providers in a uniform manner by abstracting cloud provider-specific configurations.
The Crossplane GitLab-managed application:
- Installs Crossplane with a provider of choice on a Kubernetes cluster attached to the project repository.
- Can then be used to provision infrastructure or managed applications such as PostgreSQL (for example, CloudSQL from GCP or RDS from AWS) and other services required by the application via the Auto DevOps pipeline.
For information on configuring Crossplane installed on the cluster, see Crossplane configuration.
NOTE: Note:
alpha/crossplane chart v0.4.1 is used to
install Crossplane using the
values.yaml
file.
Elastic Stack
Introduced in GitLab 12.7 for project- and group-level clusters.
Elastic Stack is a complete end-to-end log analysis solution which helps in deep searching, analyzing and visualizing the logs generated from different machines.
GitLab is able to gather logs from pods in your cluster automatically. Filebeat will run as a DaemonSet on each node in your cluster, and it will ship container logs to Elasticsearch for querying. GitLab will then connect to Elasticsearch for logs instead of the Kubernetes API, and you will have access to more advanced querying capabilities.
Log data is automatically deleted after 15 days using Curator.
This is a preliminary release of Elastic Stack as a GitLab-managed application. By default, the ability to install it is disabled.
To allow installation of Elastic Stack as a GitLab-managed application, ask a GitLab administrator to run following command within a Rails console:
Feature.enable(:enable_cluster_application_elastic_stack)Once the feature flag is set, to enable log shipping, install Elastic Stack into the cluster with the Install button.
NOTE: Note:
The stable/elastic-stack
chart is used to install this application with a
values.yaml
file.
NOTE: Note:
The chart will deploy 4 Elasticsearch nodes: 2 masters, 1 data and 1 client node,
with resource requests totalling 0.1 CPU and 3GB RAM. Each data node requests 1.5GB of memory,
which makes it incompatible with clusters of f1-micro and g1-small instance types.
Install using GitLab CI (alpha)
Introduced in GitLab 12.6.
CAUTION: Warning: This is an alpha feature, and it is subject to change at any time without prior notice.
This alternative method allows users to install GitLab-managed
applications using GitLab CI. It also allows customization of the
install using Helm values.yaml files.
Supported applications:
Usage
You can find and import all the files referenced below in the example cluster applications project.
To install applications using GitLab CI:
-
Connect the cluster to a cluster management project.
-
In that project, add a
.gitlab-ci.ymlfile with the following content:include: - template: Managed-Cluster-Applications.gitlab-ci.yml -
Add a
.gitlab/managed-apps/config.yamlfile to define which applications you would like to install. Define theinstalledkey astrueto install the application andfalseto uninstall the application. For example, to install Ingress:ingress: installed: true -
Optionally, define
.gitlab/managed-apps/<application>/values.yamlfile to customize values for the installed application.
A GitLab CI pipeline will then run on the master branch to install the
applications you have configured. In case of pipeline failure, the
output of the Helm
Tiller binary
will be saved as a CI job artifact.
Install Ingress using GitLab CI
To install Ingress, define the .gitlab/managed-apps/config.yaml file
with:
ingress:
installed: trueIngress will then be installed into the gitlab-managed-apps namespace
of your cluster.
You can customize the installation of Ingress by defining
.gitlab/managed-apps/ingress/values.yaml file in your cluster
management project. Refer to the
chart
for the available configuration options.
Install cert-manager using GitLab CI
cert-manager is installed using GitLab CI by defining configuration in
.gitlab/managed-apps/config.yaml.
cert-manager:
- Is installed into the
gitlab-managed-appsnamespace of your cluster. - Can be installed with or without a default Let's Encrypt
ClusterIssuer, which requires an email address to be specified. The email address is used by Let's Encrypt to contact you about expiring certificates and issues related to your account.
The following configuration is required to install cert-manager using GitLab CI:
certManager:
  installed: true
  letsEncryptClusterIssuer:
    installed: true
    email: "user@example.com"
The following installs cert-manager using GitLab CI without the default ClusterIssuer:
certManager:
  installed: true
  letsEncryptClusterIssuer:
    installed: false
You can customize the installation of cert-manager by defining
.gitlab/managed-apps/cert-manager/values.yaml file in your cluster
management project. Refer to the
chart for the
available configuration options.
Install Sentry using GitLab CI
NOTE: Note: The Sentry Helm chart recommends at least 3GB of available RAM for database migrations.
To install Sentry, define the .gitlab/managed-apps/config.yaml file
with:
sentry:
  installed: true
Sentry will then be installed into the gitlab-managed-apps namespace
of your cluster.
You can customize the installation of Sentry by defining
.gitlab/managed-apps/sentry/values.yaml file in your cluster
management project. Refer to the
chart
for the available configuration options.
We recommend you pay close attention to the following configuration options:
-
email. Needed to invite users to your Sentry instance and to send error emails. -
user. Where you can set the login credentials for the default admin user. -
postgresql. For a PostgreSQL password that can be used when running future updates.
NOTE: Note:
When upgrading it is important to provide the existing PostgreSQL password (given using the postgresql.postgresqlPassword key) or you will receive authentication errors. See the PostgreSQL chart documentation for more information.
Here is an example configuration for Sentry:
# Admin user to create
user:
  # Indicated to create the admin user or not,
  # Default is true as the initial installation.
  create: true
  email: "<your email>"
  password: "<your password>"

email:
  from_address: "<your from email>"
  host: smtp
  port: 25
  use_tls: false
  user: "<your email username>"
  password: "<your email password>"
  enable_replies: false

ingress:
  enabled: true
  hostname: "<sentry.example.com>"

# Needs to be here between runs.
# See https://github.com/helm/charts/tree/master/stable/postgresql#upgrade for more info
postgresql:
  postgresqlPassword: example-postgresql-password
Install GitLab Runner using GitLab CI
GitLab Runner is installed using GitLab CI by defining configuration in
.gitlab/managed-apps/config.yaml.
The following configuration is required to install GitLab Runner using GitLab CI:
gitlabRunner:
  installed: true
GitLab Runner is installed into the gitlab-managed-apps namespace of your cluster.
In order for GitLab Runner to function, you must specify the following:
-
gitlabUrl- the GitLab server full URL (e.g.,https://example.gitlab.com) to register the Runner against. -
runnerRegistrationToken- The registration token for adding new Runners to GitLab. This must be retrieved from your GitLab instance.
These values can be specifed using CI variables:
-
GITLAB_RUNNER_GITLAB_URLwill be used forgitlabUrl. -
GITLAB_RUNNER_REGISTRATION_TOKENwill be used forrunnerRegistrationToken
You can customize the installation of GitLab Runner by defining
.gitlab/managed-apps/gitlab-runner/values.yaml file in your cluster
management project. Refer to the
chart for the
available configuration options.
Install Cilium using GitLab CI
Introduced in GitLab 12.8.
Cilium is a networking plugin for Kubernetes that you can use to implement support for NetworkPolicy resources.
Enable Cilium in the .gitlab/managed-apps/config.yaml file to install it:
# possible values are gke, eks or you can leave it blank
clusterType: gke

cilium:
  installed: true
The clusterType variable enables the recommended Helm variables for
a corresponding cluster type, the default value is blank. You can
check the recommended variables for each cluster type in the official
documentation:
You can customize Cilium's Helm variables by defining the
.gitlab/managed-apps/cilium/values.yaml file in your cluster
management project. Refer to the
Cilium chart
for the available configuration options.
CAUTION: Caution: Installation and removal of the Cilium requires restart of all affected pods in all namespaces to ensure that they are managed by the correct networking plugin.
NOTE: Note: Major upgrades might require additional setup steps, please consult the official upgrade guide for more information.
By default, the drop log for traffic is logged out by the
cilium-monitor sidecar container. You can check these logs via:
kubectl -n gitlab-managed-apps logs cilium-XXXX cilium-monitorDrop logging can be disabled via .gitlab/managed-apps/cilium/values.yaml:
agent:
  monitor:
    enabled: false
Upgrading applications
Introduced in GitLab 11.8.
The applications below can be upgraded.
| Application | GitLab version |
|---|---|
| Runner | 11.8+ |
To upgrade an application:
- For a:
- Project-level cluster, navigate to your project's Operations > Kubernetes.
- Group-level cluster, navigate to your group's Kubernetes page.
- Select your cluster.
- If an upgrade is available, the Upgrade button is displayed. Click the button to upgrade.
NOTE: Note:
Upgrades will reset values back to the values built into the runner
chart plus the values set by
values.yaml
Uninstalling applications
Introduced in GitLab 11.11.
The applications below can be uninstalled.
| Application | GitLab version | Notes |
|---|---|---|
| cert-manager | 12.2+ | The associated private key will be deleted and cannot be restored. Deployed applications will continue to use HTTPS, but certificates will not be renewed. Before uninstalling, you may wish to back up your configuration or revoke your certificates. |
| GitLab Runner | 12.2+ | Any running pipelines will be canceled. |
| Helm | 12.2+ | The associated Tiller pod, the gitlab-managed-apps namespace, and all of its resources will be deleted and cannot be restored. |
| Ingress | 12.1+ | The associated load balancer and IP will be deleted and cannot be restored. Furthermore, it can only be uninstalled if JupyterHub is not installed. |
| JupyterHub | 12.1+ | All data not committed to GitLab will be deleted and cannot be restored. |
| Knative | 12.1+ | The associated IP will be deleted and cannot be restored. |
| Prometheus | 11.11+ | All data will be deleted and cannot be restored. |
| Crossplane | 12.5+ | All data will be deleted and cannot be restored. |
| Elastic Stack | 12.7+ | All data will be deleted and cannot be restored. |
| Sentry | 12.6+ | The PostgreSQL persistent volume will remain and should be manually removed for complete uninstall. |
To uninstall an application:
- For a:
- Project-level cluster, navigate to your project's Operations > Kubernetes.
- Group-level cluster, navigate to your group's Kubernetes page.
- Select your cluster.
- Click the Uninstall button for the application.
Support for uninstalling all applications is planned for progressive rollout. To follow progress, see the relevant epic.
Troubleshooting applications
Applications can fail with the following error:
Error: remote error: tls: bad certificateTo avoid installation errors:
-
Before starting the installation of applications, make sure that time is synchronized between your GitLab server and your Kubernetes cluster.
-
Ensure certificates are not out of sync. When installing applications, GitLab expects a new cluster with no previous installation of Helm.
You can confirm that the certificates match via
kubectl:kubectl get configmaps/values-content-configuration-ingress -n gitlab-managed-apps -o \ "jsonpath={.data['cert\.pem']}" | base64 -d > a.pem kubectl get secrets/tiller-secret -n gitlab-managed-apps -o "jsonpath={.data['ca\.crt']}" | base64 -d > b.pem diff a.pem b.pem